Membrane filtration and direct inoculation are the two compendial sterility test methods recognized under USP <71> and Ph. Eur. 2.6.1. The choice comes down to the product: filterable, aqueous, or antimicrobial-containing samples go through membrane filtration, while nonfilterable, viscous materials or devices go through direct inoculation. Neither method works without a passing method suitability (bacteriostasis and fungistasis) test first, and both require a minimum 14-day incubation before a batch can be called negative.
TL;DR:
- Filtration is preferred for aqueous or filterable samples, but it requires a proper rinse to prevent false negatives from residual antimicrobial suppression.
- Both methods require at least 14 days of incubation in FTM and SCDM, with growth-promoting validation done beforehand to ensure media effectiveness.
- Isolators reduce environmental contamination risks more effectively than BSCs but involve higher costs and decontamination procedures.
- Sampling should cover multiple batch points to account for variability, not just a single container, since passing tests do not guarantee overall batch sterility.
- Rapid microbial methods are not yet widely accepted as replacements for the 14-day test due to regulatory hurdles and validation requirements.
Synthrolab
Support Your Peptide Research
Synthrolab provides research-grade peptides and laboratory compounds for investigating cellular signalling, metabolism, recovery, and longevity mechanisms.
Table of Contents
What Are the Two Sterility Testing Methods and When Do You Use Each?
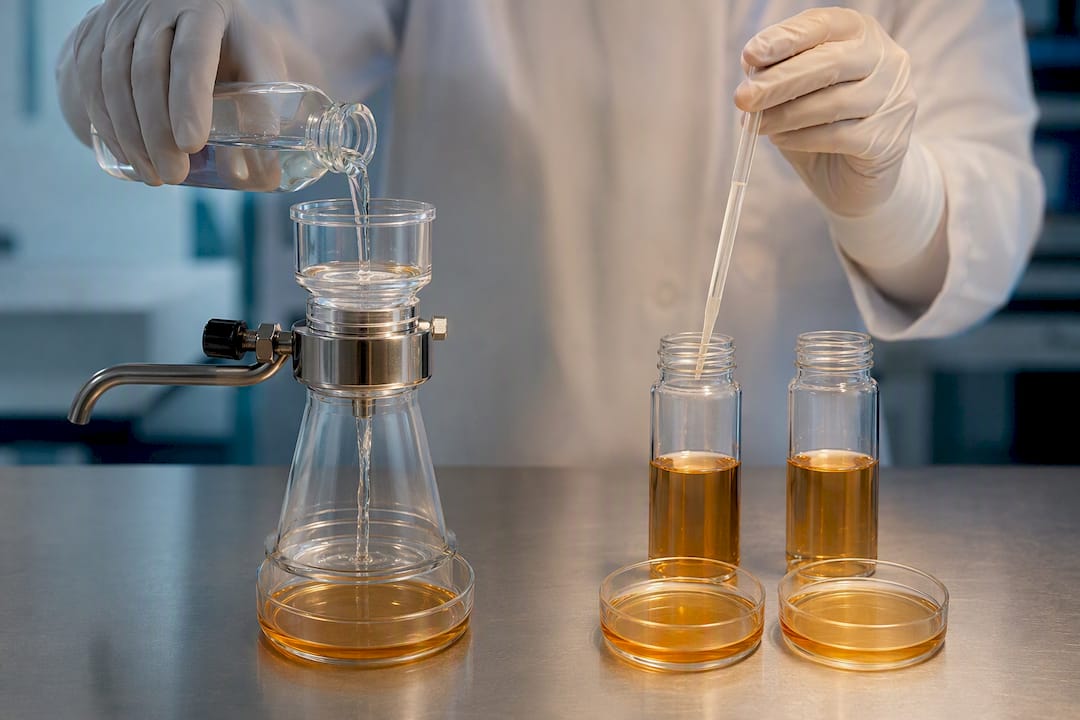
Membrane filtration is the default for anything that can pass through a 0.45 micron filter without clogging it or reacting with the membrane material. The process runs in a defined sequence:
- Filter the sample through the membrane under aseptic conditions.
- Rinse the filter with a diluent to remove residual antimicrobial activity, typically multiple rinse cycles depending on the product’s inhibitory strength.
- Transfer the membrane halves (or the whole filter) into fluid thioglycollate medium (FTM) and soybean casein digest medium (SCDM), then incubate for the full 14-day window.
The rinse step matters more than most technicians treat it. Skip a rinse cycle or underdose the diluent volume, and residual preservative or active drug substance will suppress microbial growth even in a genuinely contaminated sample, producing a false negative rather than a clean pass.
Direct inoculation skips filtration entirely. A defined sample volume, generally no more than 10% of the total media volume, gets added straight into FTM and SCDM tubes or bottles. This is the fallback for oils, ointments, viscous suspensions, and medical devices that cannot be filtered without destroying the sample or trapping organisms in the matrix. It is faster to set up but carries more risk of the product itself interfering with growth detection, since there is no rinse step to dilute out antimicrobial activity.
Throughput differs too. Filtration handles larger volumes per unit and is generally preferred at scale; direct inoculation is often the only option when a product’s viscosity or device geometry makes filtration physically infeasible.
How Long Should Sterility Tests Be Incubated?
Two media carry the entire compendial system. FTM supports anaerobic and aerobic bacteria and gets incubated at 30 to 35°C. SCDM (also called TSB, soybean casein digest medium/tryptone soya broth) targets aerobic bacteria and fungi, incubated at 20 to 25°C. Both require a minimum of 14 days before a result counts as valid, a duration set because slow-growing organisms, especially fungi and some fastidious bacteria, can take that long to produce visible turbidity or colonies.
Growth-promotion testing has to happen on every media lot before it touches a real sample. A small inoculum, generally under 100 CFU, of a reference organism gets added to the medium, and visible growth must appear within the expected incubation window, usually within a few days for fast-growing bacteria.
| Medium |
Target organisms |
Incubation temperature |
Minimum duration |
| Fluid thioglycollate medium (FTM) |
Aerobic and anaerobic bacteria |
30 to 35°C |
14 days |
| Soybean casein digest medium (SCDM/TSB) |
Aerobic bacteria and fungi |
20 to 25°C |
14 days |
Run an uninoculated media control in parallel with every test batch. If that control shows growth, the whole run is compromised regardless of what the test articles show, and it needs to be repeated with fresh, requalified media.
Why Is Bacteriostasis and Fungistasis Testing Required?
Method suitability testing, better known as B&F testing, confirms the product itself is not suppressing microbial growth before you trust a negative sterility result. Skip this step and a negative reading is meaningless. It could mean the product is sterile, or it could mean the product’s own antimicrobial properties are killing off any organisms present in the test system.
- Inoculate the test system (with product present) using six compendial reference organisms, each at an inoculum of 100 CFU or fewer.
- Compare growth in the test system against a positive control lacking the product, monitoring across the standard incubation windows for each organism.
- Confirm growth in the product-containing system reaches a level comparable to the control. That is a pass.
- If growth is suppressed, document the failure and pursue remediation before the method goes into routine use.
Remediation options include validated neutralizing agents, additional rinse volumes for filtration methods, dilution of the product below its inhibitory threshold, or switching from direct inoculation to membrane filtration where rinsing can remove the interference. Any change requires documented rationale and a repeat suitability test before the method is considered qualified.
Isolators vs BSC/LAF: Which Reduces False Positives?
Environmental contamination during sample handling is the leading cause of false-positive sterility results, not actual product contamination. Where you run the test physically matters as much as which method you choose.
- Isolators physically separate the operator from the test environment through glove ports and a decontaminated chamber, and FDA guidance recognizes them as reducing the chance of false-positive results.
- Biosafety cabinets (BSCs) and laminar airflow (LAF) hoods rely on unidirectional airflow and open access, which means they typically demand a higher surrounding cleanroom grade to hit equivalent contamination control.
- Isolators generally cost more upfront and require bio-decontamination cycles (often hydrogen peroxide vapor) between uses, which limits throughput compared to an open LAF setup.
- Industry comparisons note isolators can offset some of that cost by allowing a lower cleanroom classification around the unit itself.
Glove change discipline and material transfer protocol matter regardless of which system you use. Every transfer of a sample, tool, or media bottle into the test zone is a chance to introduce an environmental organism that then gets misattributed to the product.
Pro Tip: Track your lab’s false-positive rate by isolator versus open-hood test runs over a rolling 12-month period. If open-hood positives cluster around specific technicians or shifts, that is an SOP or training gap, not a product problem.
Outsourcing to a contract lab avoids the capital outlay entirely but shifts risk to vendor qualification. Weigh the isolator investment against your batch volume and how often a false-positive investigation would eat into release timelines.
How Many Samples Do You Need for a Representative Sterility Test?
Compendial minimums set the floor for quantity per container and number of containers pulled per batch, but the real design question is where those samples come from within the batch. Pulling every sample from the same fill position tells you nothing about variability across a run.
- Pull containers from the beginning, middle, and end of an aseptic fill to capture drift in environmental conditions over the run.
- For terminally sterilized (autoclaved) batches, sample from the coolest points in the load, typically the center or bottom, since heat penetration is least reliable there.
- Document the sampling rationale in the batch record, not just the results, so an auditor can see why those specific units were chosen.
- Treat a passing result as probabilistic assurance, not proof. WHO guidance frames sterility assurance as a probability standard, generally cited as less than a one-in-a-million chance of a contaminated unit, precisely because testing every container in a batch is not physically possible.
A pass on a small sample set is evidence, not a guarantee. That distinction should shape how confidently you communicate results to clients or regulators, particularly when a batch sits close to a specification limit elsewhere in its release testing.
Can Rapid Microbial Methods Replace the 14-Day Sterility Test?
Not yet, for release testing. Rapid methods have gotten genuinely fast. Multiplex PCR assays have demonstrated detection of multiple indicator bacteria at sensitivities below 10 CFU per mL in under 8 hours in experimental setups, a dramatic improvement over waiting two full weeks for a visual read.
The gap is regulatory, not technical.
- Any method replacing compendial sterility testing needs demonstrated equivalence to USP <71>, not just comparable sensitivity in a controlled study.
- WHO guidance notes that nucleic acid amplification and other molecular alternatives require national regulatory agency agreement before they can substitute for the standard test.
- Validation burden includes matrix interference studies, limit-of-detection work across your specific product range, and often a side-by-side bridging study against the 14-day method.
The practical path for most labs right now is hybrid: use rapid molecular or automated methods for in-process monitoring and environmental surveillance, where speed lets you catch a contamination event early, while keeping the compendial test for final release. That combination gets you faster feedback loops without betting a batch release on a method regulators haven’t formally accepted for that purpose.
What Should a Peptide Research Lab Check Before Trusting a Sterility Result?
If you’re sourcing peptides or lab compounds rather than running your own sterility program, the verification burden shifts to reading someone else’s paperwork correctly.
- Confirm the certificate of analysis actually cites USP <71> or Ph. Eur. 2.6.1, not a vague “sterility confirmed” line with no method named.
- Match the COA’s test scope to your intended use. A sterility claim tested only for bacterial contamination is not the same as one that also covered fungal growth in SCDM.
- Ask whether the testing lab has documented growth-promotion records for the media lot used. No growth-promotion data means the negative result can’t be fully trusted.
- Check reconstitution water quality separately. Peptide water that isn’t itself sterile-filtered or properly sourced can introduce contamination after a peptide has already passed sterility testing.
- Review aseptic handling documentation for sample pooling steps, since pooling multiple vials for one test can mask a contaminated unit if the sampling rationale isn’t sound.
Synthrolab’s guidance on verifying USP sterility claims and matching COAs and on peptide water quality for reconstitution both walk through these checkpoints in more detail, alongside aseptic technique SOPs for anyone running these steps in-house.
Where should a lab actually spend its sterility testing budget?
Most labs over-invest in chasing rapid methods for release testing and under-invest in the boring stuff that actually prevents audit findings: documented method suitability testing, growth-promotion records on every media lot, and a sampling rationale an inspector can follow without asking questions. Those three things catch more real problems than any faster assay will.
Isolators are worth the capital when your false-positive rate is costing you batch scrap or repeat investigations often enough to justify the spend. If it isn’t, put that money into tightening your glove-change and transfer SOPs instead. Environmental monitoring data will tell you honestly which problem you actually have.
Document every remediation decision, every B&F failure and fix, every deviation from a standard rinse cycle. When an auditor asks why a method changed eighteen months ago, “we have a note for that” beats a reconstructed explanation every time.
— Mitch
Synthrolab’s Resources for Sterility Verification and Peptide Research
Synthrolab publishes SOP guidance and COA verification checklists built specifically for researchers who need to confirm sterility claims on peptides and lab compounds before they ever touch a bench. That is a different job than running your own USP <71> program, and it is the one most research buyers actually face: reading someone else’s paperwork correctly instead of generating it.
Start with the guide to verifying third-party sterility testing scope if you’re evaluating a new supplier’s COA, or check peptide water quality standards before reconstitution if contamination risk after testing is your bigger concern. Labs and institutional buyers ordering at volume can request wholesale pricing directly from Synthrolab to get product-specific sterility documentation alongside a quote.
Sources
FAQ
Why Does Sterility Testing Require 14 Days of Incubation?
Fourteen days gives slow-growing organisms, particularly fungi and certain fastidious bacteria, enough time to produce visible turbidity or growth that a shorter incubation window would miss entirely.
What Are the USP <71> Sterility Testing Methods?
USP <71> specifies two compendial methods: membrane filtration and direct inoculation, both using fluid thioglycollate medium and soybean casein digest medium with a minimum 14-day incubation.
What SOPs Are Needed for Sterility Testing?
A complete SOP covers aseptic sample handling and transfer, method suitability (B&F) testing before routine use, growth-promotion verification for each media lot, environmental monitoring, and a documented investigation workflow for any positive result.
What Is the Purpose of B&F Testing in Sterility Testing?
Bacteriostasis and fungistasis testing confirms a product doesn’t suppress microbial growth in the test system, so a negative sterility result can be trusted as a true negative rather than a masked contamination.
Recommended
 21+ verification