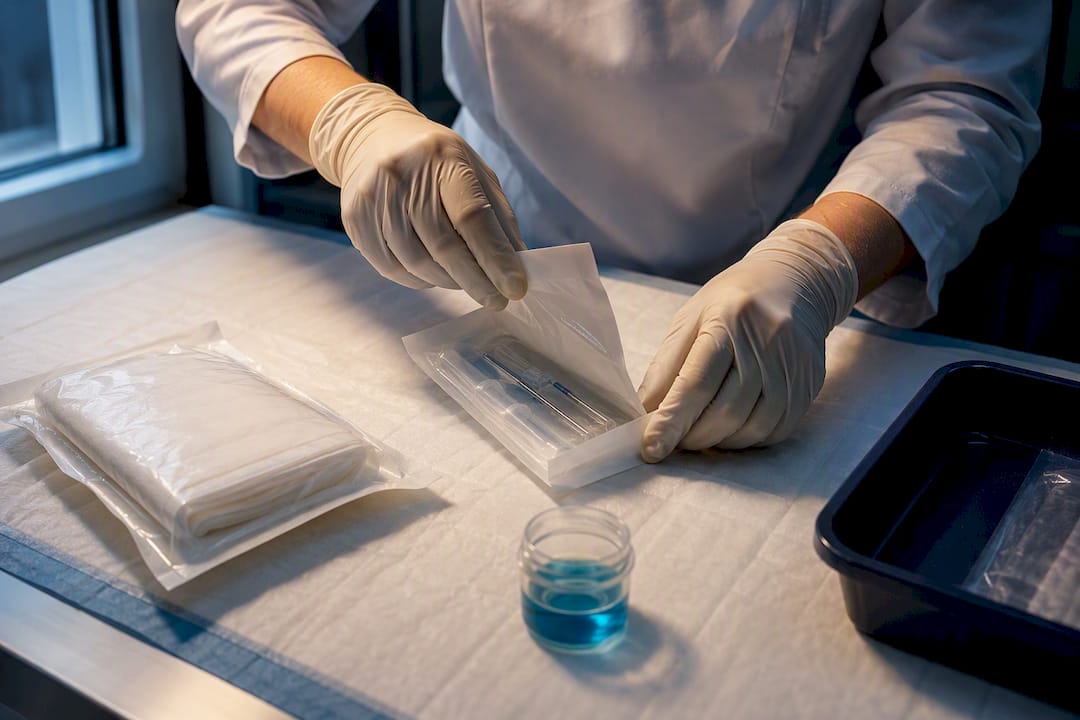
Aseptic technique is the set of procedures used to eliminate pathogens, not just reduce them, at key points of contact during clinical care and lab work. Its purpose is narrow and specific: keep key sites and key parts free of microorganisms from the moment a procedure starts until it ends. Standards from the CDC and the ANTT framework both anchor this practice, and neither leaves much room for improvisation.
TL;DR:
- Proper verification of sterility packaging is crucial, as it is the most common step skipped under time pressure and directly impacts infection risk.
- Aseptic technique involves creating barriers, maintaining a non-touch approach, and verifying equipment sterility before procedures, especially in complex or critical tasks.
- Human error, such as touching key parts with unsterile hands or rushing steps, accounts for most contamination breaches, which can be prevented with careful adherence.
- Proper lab practices include disinfecting surfaces, handling tools carefully, and working swiftly but accurately to avoid airborne or cross-contamination.
- Repetition paired with supervision and verbalization of key parts and sites builds competence and reduces contamination mistakes during practice.
Table of Contents
What Is Aseptic Technique, and How Does It Differ From Sterile and Clean Technique?
Healthcare workers throw around “sterile,” “clean,” and “aseptic” as if they’re interchangeable. They aren’t, and mixing them up leads to real contamination errors.
Sterile technique refers to the total absence of all microorganisms, viable or not. It’s the standard for surgery, where an open body cavity has zero tolerance for bioburden. Aseptic technique, by contrast, aims to eliminate pathogens specifically at the points that matter, such as an IV insertion site or a wound bed, while accepting that the broader environment isn’t sterile. Clean technique sits a rung lower still: it reduces microbial load through basic hygiene, like washing hands before a dressing change on intact skin, without pursuing pathogen elimination at a specific site.
Here’s how that breaks down in practice:
- Sterile technique: Operating room procedures, surgical implants, invasive procedures penetrating body cavities.
- Aseptic technique: Routine wound care, IV starts, urinary catheter insertion, injections, and most peptide reconstitution work in a research lab.
- Clean technique: Bathing a patient, oral care, applying a topical medication to intact skin, general surface wiping.
Lab work follows a parallel logic. A microbiologist streaking a plate for isolation is practicing aseptic technique at the loop and the plate rim; the bench itself isn’t sterile, but the transfer point has to be. The stakes for getting this wrong are not abstract. Healthcare-associated infections remain a persistent burden in U.S. hospitals, and a meaningful share trace back to breaks in aseptic or sterile procedure during invasive care, according to guidance compiled through NCBI Bookshelf. That’s the practical argument for treating these definitions as more than semantics.
Core Principles Every Practitioner Has to Internalize
Aseptic technique rests on a small number of principles that show up in nearly every guideline you’ll read, whether you’re a nursing student prepping for clinicals or a lab tech running peptide reconstitution. Master these and the specific procedures become far easier to execute correctly under pressure.
- Barrier creation. Physical barriers, gloves, sterile drapes, masks when indicated, separate contaminated surfaces from the field you’re protecting.
- Non-touch technique. Key parts and key sites are never touched directly, even with gloved hands, unless that glove is sterile and the part is designed to be handled.
- Sequencing. Work moves from clean to dirty, never the reverse. You open sterile supplies before donning gloves, not after fumbling through a drawer.
- Equipment sterility verification. Every item entering the field gets checked for intact packaging, valid expiration, and a passed sterilization indicator before it’s used.
- Hand hygiene. This one anchors everything else. A contaminated field started with clean hands is still a contaminated field.
- Environmental control. Airflow, surface disinfection, and minimizing traffic near an open field all matter more than most training programs emphasize.
Most curricula teach a version of “four moments” or “five elements,” and the exact count varies by program, but the substance converges: know your key parts, protect them with barriers, avoid touching them directly, and verify sterility before you start rather than assuming it.
Pro Tip: Before opening a single sterile package, do a full mental walkthrough of the procedure and name every key part and key site out loud. Practitioners who verbalize this step catch contamination risks they’d otherwise miss mid-procedure, when attention is split.
Packaging checks deserve their own line item because they’re the most commonly skipped step under time pressure. A sterile indicator strip that hasn’t changed color, a package with a torn corner, or a kit past its expiration date all mean the same thing: start over with a new set. There’s no partial credit in sterility. An item is either verified sterile or it’s treated as contaminated, with nothing in between.
The ANTT Framework: Mapping Key Parts and Key Sites
Aseptic Non-Touch Technique, usually shortened to ANTT, gives practitioners a repeatable framework instead of a loose set of habits. It was developed to standardize how clinicians identify what actually needs protecting during a procedure, and it’s now taught widely across nursing programs and referenced directly in NCBI’s clinical procedures literature.
ANTT splits into two practical categories:
- Standard-ANTT: Used for shorter, technically simple procedures with a small number of key parts and a general aseptic field. A routine IV cannulation is the classic example.
- Surgical-ANTT: Reserved for longer, complex procedures involving multiple key parts, larger exposed sites, or a critical aseptic field that must be maintained continuously, such as central line insertion.
The framework hinges on two definitions that are easy to state and surprisingly easy to apply once you’ve practiced them. A key part is any component of equipment that must remain sterile to work correctly and safely, think the tip of an IV catheter, the plunger tip of a syringe, or the connector on an infusion set. A key site is the entry point into the body or into a sterile container where microorganisms could gain access, such as the venipuncture site, a catheter insertion point, or the open lid of a culture vessel.
ANTT also distinguishes between a general aseptic field, appropriate for short procedures with a single key site (a simple injection, for instance), and a critical aseptic field, required when multiple key parts and key sites are exposed simultaneously or for an extended period.
Here’s how that maps onto a routine IV insertion, worked through step by step:
- Identify key parts before opening anything: the catheter tip, the needle, the hub, and the connection point on the extension set.
- Identify the key site: the venipuncture point on the patient’s skin.
- Establish a general aseptic field: a clean, disinfected surface for laying out supplies, positioned to avoid airflow disruption.
- Perform hand hygiene, then don clean or sterile gloves depending on local protocol.
- Disinfect the key site with an appropriate antiseptic and allow full contact time before puncture.
- Insert the catheter without touching the key parts against any non-sterile surface, including your own glove if it isn’t sterile.
- Secure the dressing without contaminating the site during placement.
Every invasive procedure, from a simple injection to a multi-lumen central line, can be broken down this same way: name the key parts, name the key sites, choose the field type, then execute without touching what you’ve identified as vulnerable.
Step-by-Step Aseptic Procedures for Common Clinical Tasks
Reading about principles is one thing. Executing them consistently, especially under a full patient load, is another. Here’s a compact protocol structure that applies across most invasive bedside procedures.
Before you start, run this checklist:
- Gather all supplies before opening anything (missing an item mid-procedure means re-gowning or contaminating your field to reach for it).
- Confirm sterile packaging is intact and indicators have changed appropriately.
- Choose your workspace to minimize traffic and airflow disruption.
- Perform hand hygiene per CDC technique, either 20 seconds with soap and water or the full application time for alcohol-based rub.
IV insertion and line care:
- Identify and disinfect the site, allowing the antiseptic to dry fully, don’t wipe it off or fan it.
- Apply a tourniquet, palpate the vein without recontaminating the site.
- Insert the catheter using a non-touch approach to the tip and hub.
- Secure with a sterile transparent dressing, dated and initialed.
Urinary catheter insertion:
- Set up a sterile field with all supplies laid out before touching the patient.
- Use sterile gloves for the entire procedure, this is a critical-ANTT scenario given the internal key site.
- Cleanse the meatus with antiseptic swabs, moving in one direction, never back over an already-cleaned area.
- Advance the catheter without letting it contact the labia, glans, or drape edges.
Sterile dressing change:
- Remove the old dressing with clean gloves, then discard the gloves.
- Perform hand hygiene again before opening sterile supplies.
- Don sterile gloves and apply new dressing materials without touching the wound bed with anything non-sterile.
Pro Tip: Clean gloves are appropriate when you’re touching intact skin or handling non-sterile equipment. Sterile gloves come out the moment you’re going to touch a key site directly, like a wound bed, an internal mucous membrane, or an open surgical field. When in doubt, upgrade to sterile rather than downgrade to clean.
Laboratory Aseptic Transfers: Protecting the Bench, Not Just the Body
Lab-based aseptic technique protects a different kind of “patient”: the culture, the reagent, or the reconstituted compound sitting in an open vial. The principles transfer directly from clinical settings, but the execution looks different.
- Disinfect the bench first. A 70% ethanol wipe with adequate contact time, generally a minute or more, removes the bulk of surface contaminants before any container is opened. Skipping this step is the single most common cause of contaminated cultures among students, according to lab protocol guidance from Maricopa’s microbiology curriculum.
- Choose your sterilization method by biosafety level. An open flame works for BSL1 loop sterilization, but BSL2 procedures call for an incinerator instead, since an open flame can aerosolize infectious material off a loop. Sterile single-use loops and pipette tips eliminate the sterilization step entirely and reduce risk further.
- Work fast, but not carelessly. Minimize the time any container sits open. A culture tube or media bottle exposed to room air for even a few extra seconds picks up airborne contaminants at a meaningfully higher rate.
- Flame the neck of glass containers (where BSL1 protocols apply) immediately after removing the cap and again before recapping, creating a rising heat column that pushes airborne particles away from the opening.
- Handle pipettes without letting the tip contact anything but the target liquid. Setting a pipette down on a bench surface between draws, then reusing it, is a contamination pathway that’s easy to overlook when you’re moving quickly.
- Streak for isolation using a cooled loop. A loop straight off the incinerator will kill the organism you’re trying to transfer; let it cool for a few seconds in the air or touch it to an uninoculated part of the agar first.
- Cap and label immediately after transfer. An open, unlabeled tube sitting on a rack is both a contamination risk and a mix-up waiting to happen.
Reconstitution work in a research lab, mixing lyophilized peptides with bacteriostatic water, for example, follows this same logic. The septum gets wiped with alcohol and allowed to dry, the syringe never touches anything but the target vial’s rubber stopper, and the needle gets changed before the final draw if it was used to puncture more than one septum. It’s a scaled-down version of the same non-touch discipline that governs a hospital bedside.
Building and Protecting a Sterile Field
A sterile field only stays sterile if every item placed on it is verified sterile first, and if the boundaries of that field are respected without exception.
- Only sterile items belong inside the field. A single non-sterile object breaks the entire field’s integrity, not just the spot where it landed.
- Open sterile packages by peeling back the outer wrapper away from your body first, then away from the contents, so your hands and clothing never cross over the sterile interior.
- Check every sterilization indicator before use. A strip or tape that hasn’t changed to the expected color means the item did not reach sterilizing conditions and cannot be used.
- Reject any package that’s wet, torn, or past its expiration date. Moisture is a wicking path for microorganisms straight through a barrier that’s designed to block them.
- Treat the outer one inch of any sterile field as contaminated by convention, even if nothing touched it. This margin accounts for airflow and incidental contact you might not notice.
- If you suspect a breach, whether a sleeve brushed the field or an item’s sterility is in question, stop and open a new sterile set. There is no safe way to “probably still be fine.”
Autoclave-based sterilization, the standard for reusable instruments, requires steam at roughly 121°C under 15 to 20 psi for a set exposure time, and that time has to scale up for larger loads or denser packaging, according to sterilization principles outlined in Ohio State’s microbiology lab materials. Disinfection is not a substitute for this process. It lowers microbial counts; it doesn’t achieve the all-or-nothing state that sterility requires.
Hand Hygiene, PPE Selection, and Keeping the Environment Under Control
Hand hygiene is the single highest-leverage habit in the entire aseptic technique toolkit, and it’s also the one most frequently done wrong under time pressure.
The CDC’s hand hygiene guidance sets clear rules: use soap and water when hands are visibly soiled or after contact with spores like C. difficile, since alcohol doesn’t reliably kill them. Use an alcohol-based hand rub for routine decontamination between patient contacts, it’s faster, less irritating with repeated use, and effective against most other organisms when applied to fully cover both hands for the full recommended contact time, generally around 20 seconds.
Hand hygiene lapses remain one of the most preventable contributors to healthcare-associated infections, a burden the CDC and WHO both treat as a primary target for reduction through routine compliance monitoring.
PPE selection follows the task, not the setting. A routine dressing change on intact skin calls for clean gloves. Inserting a urinary catheter, accessing a central line, or handling an open surgical wound calls for sterile gloves and, depending on protocol, a mask or gown. Environmental control rounds this out: disinfect high-touch surfaces regularly, and for any spill involving blood or body fluid, follow a documented cleanup protocol using an appropriate disinfectant rather than improvising with whatever’s on hand.
Where Contamination Actually Happens (and How to Catch It)
Most contamination traces back to a small set of repeat offenders, and nearly all of them are avoidable once you know to watch for them.
Human error accounts for the majority of breaches:
- Touching a key part or key site with an ungloved hand, or a gloved hand that isn’t sterile.
- Reaching across an open sterile field to grab something instead of walking around it.
- Rushing the sequence, skipping hand hygiene between steps because a procedure feels routine.
Equipment and environment failures matter just as much:
- Wet or torn sterile packaging that went unnoticed before use.
- An autoclave cycle that ran short or at insufficient temperature, producing instruments that look sterile but aren’t.
- Aerosol-generating steps performed too close to an open culture or field, especially at BSL2 and above.
Pro Tip: If you catch a possible breach mid-procedure, stop and address it immediately rather than finishing “carefully.” A completed procedure with a suspected contamination event still needs to be documented and, in clinical settings, reported per your facility’s protocol, even if the patient shows no immediate signs of infection.
Quick Reference Card for Aseptic Procedures
Keep this nearby during early training or any unfamiliar procedure.
Before you start: gather all supplies, verify sterility indicators, disinfect the workspace, perform hand hygiene.
Glove decision: intact skin or non-sterile equipment, clean gloves. Any key site or internal access point, sterile gloves.
Disinfectant contact time: allow antiseptics and surface disinfectants to sit for the full labeled time, don’t wipe or fan them dry early.
If the package is wet or torn: discard it and open a fresh sterile set. Don’t inspect it further hoping it’s still usable.
If you’re unsure whether something is contaminated: treat it as contaminated. That default protects the patient or the sample every time.
One-line reminder: work clean to dirty, never touch a key part or key site directly, and finish what you start without pausing mid-field.
| Situation |
Field Type |
Glove Choice |
| Routine injection |
General aseptic field |
Clean gloves |
| IV insertion |
General aseptic field |
Clean or sterile per protocol |
| Urinary catheter |
Critical aseptic field |
Sterile gloves |
| Central line insertion |
Critical aseptic field |
Sterile gloves, gown, mask |
| Sterile dressing change |
General aseptic field |
Sterile gloves |
How Synthro Lab’s SOPs Put These Principles Into Practice
Standards mean little until they’re written into a workflow someone actually follows at the bench. Synthrolab’s internal SOPs translate ANTT principles into concrete lab steps for researchers handling peptides and reagents.
- The Bacto Water guide walks through septum disinfection, drying time, and needle changes between draws, all direct applications of key-part protection during reconstitution.
- The injection site rotation SOP standardizes site selection and handling to reduce repeated trauma and contamination risk at a key site.
- Guidance on peptide water and solvent handling covers surface disinfection and vial handling before reconstitution begins.
Each of these documents maps back to the same core idea covered throughout this guide: name the key part, protect it, verify before you use it, and never assume sterility that hasn’t been checked.
Teaching Aseptic Technique: What Actually Builds Competence
Repetition without feedback doesn’t build skill, and I’ve come to think that’s the biggest gap in how aseptic technique gets taught. Watching a demonstration once, then practicing solo, skips the step that matters most: someone catching your errors before they become habits.
The better approach pairs deliberate, supervised practice with a “plan first” mindset. Before touching a single supply, name every key part and key site out loud, the same mental walkthrough described earlier for IV starts. That habit, drawn from teaching approaches documented by Truckee Meadows Community College’s microbiology program, builds anticipation into the procedure instead of leaving contamination risk as something you react to after the fact.
Self-audit matters too. After any procedure, ask what you touched, in what order, and whether any step felt rushed. That honest review, done consistently, closes gaps faster than any amount of passive instruction.
— Mitch
Where to Find Research-Grade Materials for Aseptic Lab Work
Getting the procedure right matters just as much as getting the materials right. Synthrolab exists for exactly that second half of the equation: research-grade peptides and lab compounds with independent purity testing and certificates of analysis, so the reconstitution steps you follow aren’t undermined by a contaminated or mislabeled starting material.
The Bacto Water guide walks through safe multi-entry vial handling in detail, and the injection site rotation SOP gives you a ready-made template if you’re building out your own lab’s documentation rather than starting from scratch. Both are free to adapt for your own protocols. If you’re sourcing the compounds themselves, browse the peptide guide for researchers to see current options and batch testing documentation before placing an order.
Sources
The sources referenced throughout this guide provide the fullest detail on aseptic technique, sterile procedure, and infection prevention standards.
Recommended
 21+ verification